Friday 16 August 2013

Fuji's X100s - 'The Digital Siren'


After much thinking and researching online I finally put my money down on a new camera.  £1000 is a sizable sum and I hesitated for awhile before taking the plunge.  I have had the camera now for several weeks and as I work my way around the camera and use it in different situations I wanted to collect my thoughts into one place.  There are numerous positive video reviews of this camera online with experienced Photographer's describing it as the 'best digital camera' available, 'the new Leica' or announcing that 'the DSLR is dead'.  Make your own mind up, but here is my take on the camera from the point of view of a reluctant digital camera user.

What do I want or look for in a camera?

I have a collection of old film cameras and there are aspects from all of them that I like:

Olympus Trip. 

For sheer fun and "get-out-of-the-way-and-let-me-take-pictures" I love this camera.

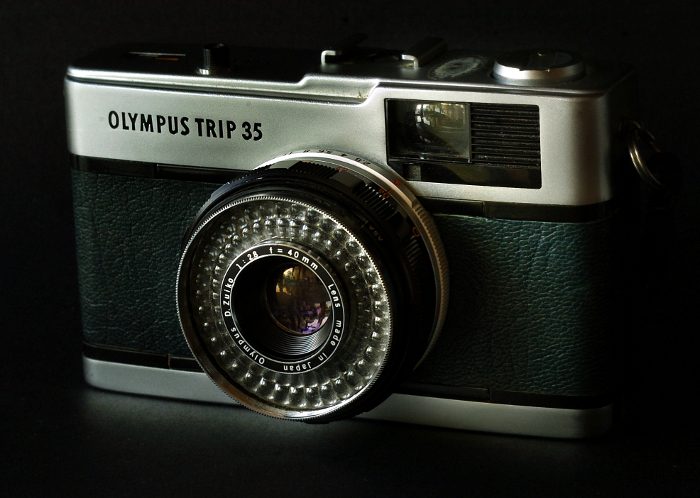
Zone focusing, great fast fixed 35 mm lens, no batteries.  The viewfinder is bright.  OK it's not great for moving subjects, but you can work with that.  The shutter is either 1/40th or 1/200.  Cheap at around £25 for a good example.


The Canonet QL17 MIII

"The Poor Man's Leica."

Now quite sort after and with good reason the Canonet Quick Load 17 represented the culmination of the design of a range of Canon's.  It's a lovely camera.  Small, easy to use, aperture priority with manual override (but with no metering).  Great fast lens f1.7.  Very quiet, nicely discreet.  Bright viewfinder.  I paid about £100 for mine.  Here's a photo that puts it alongside the X100s - and I thought it was just me that spotted the similarity.  It comes from a review of the X100s and includes other side-by-side comparisons. http://theonlinephotographer.typepad.com/the_online_photographer/2011/07/fuji-finepix-x100-review.html

Some of those aspects are important to me - Discrete, silent, bright viewfinder a la rangefinder, fast lens, auto/manual and easy to use.

The Nikon F-301 (aka N2000)

What?!

I bought this camera as a spare body since I had several Nikon lens and I thought it might be useful if I wanted to shoot colour as well as black and white at the same time.  It's heavier than my FM2 (http://en.wikipedia.org/wiki/Nikon_FM2)
but the added built-in winder is useful, also adding a valuable right hand grip.  It has Programme, Aperture and Shutter modes plus manual.  Easy ASA adjustment.  Good metering.  Here's the killer - it's relatively cheap.  I paid £10 for mine.  I use it mainly in combination with an off-camera flash synced via a lead since winding on one-handed is a chore and I want to keep my eye to the viewfinder.

 Digital

Shoot more, especially in low light, colour or black and white - choose later, adjust and re-shoot immediately, edit in camera, edit on computer and use share straightaway.

OK, I get those advantages after working in film.  But one of the things I have struggled with using digital cameras is that I want to set either the shutter speed, aperture quickly without having to dig through menus.  I also want to be able to easily open up or stop down a few stops, quickly.  The X100s 'retro' design means that I can work like I used to.  Switching either the shutter speed or aperture away from 'A' means that it enters Aperture or Shutter speed priority.  Switching both means it's in Manual.  Great.  Right under the thumb is the dial to open up or stop down.  Terrific.  I have the best of all worlds, something the X100s seems to repeatedly achieve.

Settings.  There are still menus - 'Quick' or otherwise.  I can shoot discretely and quickly under very low light levels.  I like the film simulation settings and these can be combined with the film bracketing feature so I can shoot colour and have the camera process black and white versions with a yellow and green filter immediately.  ISO settings of 6400 still look great.

DSCF0996

Jpegs.  By adjusting the DR Range it's possible to adjust the way the camera processes the Jpgs.  So I mostly shoot jpgs and avoid editing them in post.  That's a massive time saver. 

Flash.  The onboard flash is great.  Since the camera has a leaf shutter I can sync the flash speed to any shutter speed (except very high shutter speeds and low apertures).  That gives me great freedom to use flash to fill in and balance the ambient light.

Viewfinders.  It has two viewfinders - in effect.  The Electronic and the Optical.  I was puzzled by this at first.  Why wouldn't I want to use the electronic ones all the time?  There is no parallax and I can see what the photo will look like.  Perfect?  Well actually I use both.  The Optical viewfinder is more immediate - I still see the photo briefly in the finder after I've taken it.  It takes me right back to the Olympus Trip.  I like it.  Mostly I don't worry about parallax.  I shoot slightly looser so I can crop later.

Focus.  There are 3 focus modes - automatic, continuous automatic and manual.  I  really like the manual mode.  In manual mode I can push the AFL button to autofocus if I need.  There is 'MF assist' which zooms the centre of the viewfinder when the lens is manually focused.  It's quick and easy to use.  Again everything you need is under your fingers.  Good design.

Lens.  OK a single focal length - the equivalent of a 35mm, like the Trip and the QL17.  It's a good all rounder.  I prefer a 24mm on a 35mm camera but that wouldn't be so broadly practical, especially when you photograph people.  I actually like that I can't change lens or zoom.  Less choice is quicker!  The lens itself is small, light and fast too at f2.

White Balance.  There are presets and of course auto.  You can also adjust the colour balance  quite easily.  Auto seems to work well under most conditions.

Images.  Oh yes I forgot to say the images look really nice!

Time Graham 3

Issues.  Are there issues? Sure, there are a few none that are serious photographically for me.  I would say that the firmware could do with a polish to resolve most - the histogram in the Optical Viewfinder which would be really useful - but doesn't work.  (Update 27th August, and thanks to Dean Johnston - no relation!,  Point 2 solved the problem for me.)

Video.  You wouldn't buy this camera to shoot video, which is just as well.  You can't manually adjust the aperture, only the focus while recording.  That's a real shame.  I have read that the video shows a lot of moire.  I haven't noticed that. You can't plug in a mic so that leaves 'dual system' as the only way to work.  Setting the internal mic levels is buried deep in the menus.  I'd love to see this improved with a firmware update.  Maybe that's possible, if not, I'm not bothered.  For a camera that offers so much in a small handy package, I reckon that's enough for me.

I found this video by David Hobby particularly useful.


Thursday 1 August 2013

Montage editing

A different way of thinking about editing.


When you used the '5 shot method' the idea was to cover an action from multiple poitns of view in such a way that you could then edit them in a way that seemed continuous'.  This is know as continity editing.  Important things are the same so the cuts are 'hidden' or the viewer is unaware of them.  Things like:
  • screen direction
  • action (starts in one shot continues in next)
  • lighting
  • costume
  • actors
  • sound (digetic)
There is a style of editing that breaks this convention for effect.  It makes a feature of the edit - by that I mean the transition from one shot to another.  Placing one shot in front or behind another creates a juxtaposition.  From this we construct a meaning. We have learnt to do this.  It’s the association of the 2 images that creates meaning for the Viewer.   To edit we need to understand these ideas since they are the basis of assembling visual stories. If we see the shot of a building followed by a woman at a desk we assume that she’s working in the building. This is a learned response developed over time.

A little history.

The technique of juxtaposing images has come to be known as ‘montage’, named by Eisenstein from the French meaning ‘assembly’. Montage is used to refer to the associative or intellectual juxtaposition of images. In his quest to deconstruct film-art, theorist Lev Kuleshov’s experiments explored the associative powers of juxtaposition and stressed the role of the editing in their combination.

Lev Kuleshov (http://www.thefullwiki.org/Lev_Kuleshov)


The birth of the REACTION SHOT!

In one experiment Kuleshov used what is now know as the ‘three shot sequence’. He took a piece of film of the actor Muzhukhin with a deadpan expression. He then cut in 3 successive ‘insert’ images; a bowl of soup, a small child and an old woman in a coffin. Then it cut back to Muzhukhin for a ‘reaction’ shot. When viewers saw the cut from Muzhukhin to the insert shot it to be what he was seeing, his POV. The viewers failed to notice that the footage of Muzhukin before and after the insert shot was identical. Instead they were struck by his "subtle but convincing portrayal" of 3 emotions - hunger for the soup, joy at the child and remorse for the old woman, in the reaction shots. Since there was no acting in the sequences Kuleshov argued that the meaning must have been created in the Viewers’ minds purely by the juxtaposition of uninflected images. By changing the experiment to include different reaction shots he found that the meaning of the sequence could be altered by the shot order. (Smiling - gun - frowning = fear, frowning - gun - smiling = bravery).

Vsevolod Pudovkin (http://dic.academic.ru/dic.nsf/ruwiki/34522)


Within Soviet Montage there were a number of schools of thought. These were characterised by two ex students of Kuleshov’s; Pudovkin and Eisenstein. Podovkin went on to develop his own ‘5 editing principles’ based on montage theory and juxtaposition:
  • 1. Contrast
  • 2. Parallelism  (2 separate actions that are intercut)
  • 3. Symbolism. Cutting from one shot to a completely different shot that in some way symbolises the action/character in the first
  • 4. Simultaneity. This creates tension in the viewer since 2 actions on screen at the same time lead to an outcome that will connect both on screen
  • 5. ‘Leit - motif’ - a reinteration of theme. The repetition of shots or a sequence to reinforce the theme

In 1925 both were charged with making a film about the Revolution. Pudovkin’s family based ‘Mother’ favoured the smooth montage and 'relational editing' of shots that maintained some continuity in time and space, following the route of American Director DW. Griffith.

Mother 1926


While Eisenstein’s grand symphony ‘Potemkin’ favoured more ‘dialectical’ editing, extending the juxtaposition further and abandoning any semblance continuity instead providing a shock or jolt. The dialectic is argued using contrast and irony. His ‘collision’ of images used conflictional content, still/dynamic, screen direction, large/small, dark/light, real time/perceived time. He was particularly keen to exploit editing’s ability to create it’s own sense of time, or ‘film time’, drawing out and dramatising particular moments. He also popularised the use of very short shots.

Potemkin 1926


Here's Hitchcock talking about his use of montage in Psycho (he finishes off with Kuleshov's famous experiment re framed with him!)


‘Temporal ellipsis’ is an editing device that might be confused with montage. In Hollywood and in scriptwriting formatting, this technique is often referred to as a ‘montage’. It is used to compress time, and is visibly seen to do so. It lies in the area between montage and continuity cutting. Filmic time is shortened or speeded up primarily to move the story forward, so unimportant items are omitted - ellipsis.

Back to today.


We see montage so much these days that we take it don't notice it.  But montage isn't random.  Editors still have to use some elements of continuity in order to create meaning without confusion.  Two great areas to look at for use of montage are adverts and music videos.  We'll look at music videos.  Here's a great example of a Music Montage using clips from recent box office films.


(This video is an attempt to use available footage from films released theatrically during 2011 to weave a cinematic narrative of its own.)

Enjoy the edit but watch it a second time noticing how the clips have been combined.  How has the editor made the cutting coherent and smooth.  It lacks real continuity but the Editor has still found a way of creating continuity.  What devices has he used?  Make a note and then compare to Pudovkin's 5 principles.

There is still an overall structure too - the edit has a beginning, it develops and concludes effectively.

Here is another great example that uses the same premise.


A little more history

If you are interested in understanding more about the development of editing and parallel editing I have written a longer blog post about all of this here.

For the next task:

*Choose a piece of music and using the selection of short film clips (The Prelinger Archive's "Panarama Ephemera") provided in the Gatehouse create a 60 - 90 second montage.  When you have finished this you need to compress the file and upload it to YouTube, embed in a blog and then REFLECT on the process.  I have provided a lot of research that you could use!

* Choose the music carefully.  You must be able to prove to me that you have clearance to use it.  It needs to present you with a opportunities to edit.  Not just 'on' the beat but with the rhythm, instrumentation, tone and mood.  Avoid tunes with lyrics - they often work against the images or else really limit your flexibility in the edit.

Here is Leila's recent screencast about trimming in Premiere Pro.


Moving the camera - 'The Extended Take'.

Over the last few weeks we have been concentrating on editing in terms of continuity, montage, and conventions. This week we want to shift emphasis to the camera and the frame - where we started at the beginning of the term.

There are times when, for artistic reasons, a Director will avoid using the cut.  Hitchcock shot 'Rope' in 4 unbroken takes (Each a reel of film).  The actors and the camera were choreographed to achieve the desired variations in shots and framing.  Since the film is based on a play the result is very theatrical in effect.  Other Directors have used the technique as a way of making a statement about their skills.  A famous example is from the opening sequence of "Touch of Evil'.  Orson Welles wanted to impress prejudiced Hollywood Producers in an attempt to re ignite his Hollywood career.  Below is the 4th and final take of the day.  Many of the extras had gone home but it's the one that made the edit.  It has a beginning, a development and conclusion.  It also serves to introduce the theme, main characters and context of the film.


That opening scene is SO famous that here it is referenced in Robert Altman's 'The Player'.  (This movie is stuffed full of insider references.  But the 'hommage' to Touch... is obvious and flagged up in the dialogue!)


One shot movies take the idea of 'extended takes' to it's extreme.  'Russian Ark's a whole actual film that was shot in a single take.  It was a huge undertaking.  It was shot on a video camera but the batteries meant that there was only enough battery power for a limited number of takes on the day.  Permission to use the Hermitage Museum meant that there was only ONE day to shoot.  Oddly it's the 4th and final take that was completed (it was the ONLY complete take).


Which brings us to Timecode.  Here we have 4 cameras all shooting simultaneously and then shown simultaneously as a split screen movie.  This movie was shot on new for the time Sony video cameras.  It was shot 14 times - they started shooting once a day.  Then the cast would watch it, agree changes with Mike Figgis the Director, then repeat the next day.  Sony pulled the plug so they went to 2 takes a day - making the full use of daylight hours.  The finished film is also the final take.  Take 14.


Can you actually tell a whole 'story' in a short single shot film?  Yes...


These films were made by Artists for the Arts Council a few years ago.  Their strengths are a simple idea, carefully staged and filmed.


We will do this as a team activity on Wednesday 12th December.  Meet at 2pm in GH201.  So prepare your teams and ideas ahead of the session.  You might want to get some props etc.  One member of the team will need a digital stills camera.

Final Task of the year! Plan and shoot single shot movie.  Slate your takes. Upload/embed reflect and review on the blog using behind-the-scenes photos. (So each team needs a photographer too.)

Remember to 'block' the movement through.  Plan the movement of the camera.  Hitchcock's advice is valuable here

“Make the most important thing the largest thing in the frame.”

Careful handling the camera.  Minimise rotation on the axis.  Be careful of risks of tripping and dropping the camera.  Focal length is important.  Use WIDE.  Why?

Rich Wood has prepared a screencast on 'grips' to help you.


Remember the action/narrative is a single ‘action’.  It needs a beginning – Inciting incident – development – resolution.  Beginning/middle/end.

Finally here are a selection of films related to expended takes in a single YouTube playlist.

'EXTENDED TAKES'


The cost of free music! (Permission Vs time)

What is 'free' music?

http://londontheinsideswag.blogspot.co.uk/2012/09/free-burritos.html
When someone makes or creates something the ownership of that item belongs to them (unless they do it as part of their paid employment).  The copyright is the Creator's.  If someone uses the item subsequently then they should do so with the Creator's permission.  That might also include payment.  The internet makes it possible to distribute material separated from it's original context and Creator.  The ownership and property rights of online material is a very complex issue.  Check out the film below.

Rip: A remix manifesto


Just because you can find music on the Internet doesn't make it 'free'.  It just means that it's available to you.  In the work that I do with students I always insist that the music you use is copyright cleared.  That is to say that you can demonstrate that you have permission from the copyright holder (who may not necessarily be the Creator) to use that music for your specific project/film.

It is quite easy to find 'copyright free' music.  It's sometimes referred to as 'copyleft' music. It's still not actually really free - some rights are reserved.  Most commonly it is licensed under a 'Creative Commons' license.  These are designed specifically for the Internet Age - since previous copyright structures have proved difficult to employ a global web context.  Student work is 'non-commercial' so the most basic CC license allows Students to use the material as originally created with just a credit.  This is an easy request/requirement to meet.


What is 'Royalty free' music?  


This is music that doesn't require a User to buy it but often still requires  licensing payments depending on context of use and repeats etc.  It's not 'free' as in 'nothing to pay'.

What is the downside of using copyright free music?


There is so much out there that is unsuitable for your project or plain terrible.  So it takes time to find what you need.  But if you have a good idea of what you want , then it's just a matter of time.  So start looking AS SOON AS YOU CAN.  If you are in a group then nominate a 'music researcher'.  Get them to find a selection to play to the team.  Remember to collect the details of the musicians, lable, webiste etc.  You will need these in you documentation.

Isn't this all rather uncessary.  No one else bothers with it!

Put yourself in the position of the musician, artist, writer, Poet, scultper, designer, Record label etc.  It's their work so they should make the decision.  You will own the copyright for your project.  If you want to enter your film into a festival they will need to know, from you, that you have the rights.  All the rights which includes any material created and used in that film.  If you don't then they can't show it.

Where do you look for CC music?

Creative Commons

Vimeo Music Store

Internet Archive

Freesound.org

Opsound.org

Philharmonia Orchestra (samples)

Jamendo

As a big fan of Soundcloud I would also suggest that you could source some really great music here too.  It's not CC'd but it's quite easy to contact the musicians via SoundCloud to ask permission to use it for a project.  Here's a 'User' called 'Music for non profit films'


You can also contact 'Record' labels directly too, if they have a track or artist you like.  They will often grant you permission in an email.  That email is enough prove for me!  The smaller the label the more student- friendly they seem to be.  But you need to allow time for them to grant you permission.

Workflows – or the dull art of planning ahead.


Now you have worked on your personal projects it might be a good time to reflect on your media production working practice.  We could refer to this as ‘The workflow’ of a project, primarily in post production.  Why now and not before you went into production?  Well it’s hard to understand why you need to think about this until you discover its importance.

At first glance it seems over-complicated and time consuming.  You can make it as complicated as you like – that’s your choice.  If you get stuck during post production, you might decide that a little planning might actually save A LOT of time!  (To say nothing of the stress and frustration.)


What format are you shooting in?  What camera will you be using?  What arrangements for sound will you make?  What control will you want to exercise over the material?  There are consequences for all these decisions.  Just deciding to shoot on the ‘best’, most expensive, highest quality camera is not necessarily the obvious choice.  You need to work it back from the ‘deliverable’.  What does the client want?  What have you been asked to provide.  This will suggest the minimum for the project.  If you think there is an advantage in ‘future- proofing’ your work then you might want to increase the technical spec of the project.  Mixing formats, codecs and frame rates is possible on one Premiere timeline but it’s worth trying to avoid this if you can.  At least minimise it.


When you create your Premiere project make sure that your Timeline uses the settings that match your shooting format.  (Tip:  The first time you drag a clip into the Timeline if the settings of the clip don’t match the sequence settings Premiere will ask you if you want to change the sequence settings.  Yes, you so do!  GOTCHA! If you use a keyboard short cut to place the clip it doesn’t offer you this option.)


Once you have decided on the camera, frame rate/size and codec it’s worth thinking about the organisation of your project.

This seems rather dull in comparison to being on location or editing.  But it can have a huge effect on the ease with which you complete post production.  How complicated can it be to find something on a computer?  Answer – very!

Macro level – file structure


When I work on a project I use a pre-created folder structure and I then stick to it religiously.  Because everything has a place – the same place for each project – I can always find things.

Here is my Folder Template


Here is a link to the folder.  Download a copy if you want.

I don’t use every folder in every project but it covers most of the situations I meet.  If it didn’t I’d adapt the template.

There are moments when this approach really shines; when you move or copy the project.  You get ALL the files.  Also when you are sharing post production.  Your colleague can follow the pattern and everyone can save and file things logically.

Notes and paperwork and should be stored too with the project.  CS6 offers a wide range of applications that you might use on your project.  All these different application files need to be stored together.  These programmes generate supplementary files.  Make sure these too are stored in the place you want them.

Micro level – naming conventions


Is that all it takes?  If you just did that, you would find things much easier.  But you can take it further.  When you look for a file on a computer you start by looking where you might have put it.  If it isn’t there you do a search based on titles or words.  Deciding on a ‘naming convention is a small housekeeping step that can have a large effect.

I name my project folders using the US date format plus a logical title.


See how the use of the date has automatically organised my projects in date order.  You need to use the MM-DD-YY date format.

When you are shooting a narrative based film deciding on your naming convention and using it on location will mean that you can find the material based on useful criteria. For logistical reasons most films are not shot in story order.  Therefore slating a take using

Scene:Shot:Take (00:00:00)


means that when the shots are logged or subclipped, the result will be that all the takes automatically end up in script order (and take order).

If you are using ‘dual system audio’ using the same convention with the addition of an A (00:00:00A) for audio will result in the video and the audio of the same take being listed with the video first and the correct audio immediately below.

You can customise your naming convention to include information that will help you later, and that’s the key.  You need to PLAN AHEAD.  You might want to add a camera operators initial, a camera number (for multi-cam), or location tag or similar.  You are effectively adding your own ‘metadata’ in the file name.

Organisation = time, on even a small job this might make the difference between breaking even or making a profit.  The bottom line is that organising IS editing!  The ‘Pareto Principle’ can be applied to editing – 80% of your editing time will be taken up with the last 20% of the edit.  So once the rough edit is complete you will probably need 4 times that time to complete the edit!

Exporting


The care and attention you have spent on your production workflow and edit can all be undone by sloppy exporting of your project.  When this happens it’s possibly a result of rushing, and therefore bad planning, or a lack of understanding of the source and output settings in Media Encoder.  Play spot the difference – then figure out if the differences are what you want!


If you export using the sequence settings you will get a rendered output file that is identical to the sequence.  However it’s more likely you have a particular use or format in mind such as YouTube, Vimeo, disc, USB etc.  Whatever settings or pre set you use (and the Media Encoder’s are good) the rendering and compressing can take quite a while.  See the example above the frame rate is identical but the frame size is reduced and compressed using the H264 codec.

It’s worth selecting a short section that best represents the encoding challenge* and just exporting that.  Then check the playback and framing, before exporting the whole sequence.  You might also want to experiment with a variety of settings.  Label these carefully and store with your project.  You may want to refer back to them again.

* What would be an ‘encoding challenge’?  Think about the process of compression and the answer is quite logical.  Any changes in frame size, codec and frame rate (particularly an increase) will require the computer to perform calculations.  The compression algorhythm has to interpolate and generate frames so the amount of compression can hugely affect export times.  Pick a section that includes rapid change from one frame to the next.  If movement is predictable it requires less compression than movement or change that is really random.  Think water or smoke verses movement from left to right.  Rapid lighting changes or any section that involves graduated change.  Artifacts are often very visible at these moments.  If the effect is bad you may have to adjust the output settings.